Have you ever wanted to capture the breathtaking beauty of mountains from above? Drawing a bird’s eye view of a mountain can seem tricky, but with the right steps, you can create stunning artwork that feels alive and real.
In this guide, you’ll learn simple techniques to bring your vision to life, even if you’re just starting out. Get ready to surprise yourself with a drawing that shows the world from a whole new angle. Keep reading, and let’s unlock your creative potential together!

Credit: www.freepik.com
Materials Needed
Drawing a bird eye view mountain requires some basic art supplies. Having the right materials makes the process easier and more enjoyable.
Use simple tools to help you create clear shapes and textures from above. These materials will guide you in your drawing.
Pencils
Pencils help you sketch the mountain’s outline from a bird’s eye view. Use different hardness levels for shading and details.
- HB pencil for light sketching
- 2B or 4B pencil for shading
- Eraser pencil for fine corrections
Paper
Choose smooth or medium-textured paper. It should be strong enough for erasing and shading.
A4 or sketchbook paper works well for bird eye view mountain drawings.
Eraser
A soft eraser helps fix mistakes without damaging the paper. It is important for cleaning up your sketch lines.
- Kneaded eraser for gentle lifting of graphite
- Rubber eraser for stronger erasing
Ruler
A ruler assists in drawing straight lines and measuring distances. It helps keep your bird eye view accurate.
Colored Pencils Or Markers (optional)
Colored pencils or markers add color and depth to your mountain drawing. Use them to highlight different parts like trees or rocks.
Choose earth tones like greens, browns, and grays for a natural look.
Choosing The Right Perspective
Drawing a bird eye view mountain shows the scene from above. This view helps show the shape and height of the mountain.
Choosing the right perspective makes your drawing look real and interesting. It helps place the mountain in the right spot.
Understand Bird Eye View Perspective
Bird eye view means looking straight down from above. It shows the top of the mountain and the land around it.
This perspective changes how you draw shapes. The mountain looks flat at the top but tall on the sides.
Decide The Angle Of View
Pick how high your view is above the mountain. A higher angle shows more land and less detail on the mountain.
A lower angle shows more mountain details but less ground around it. Choose an angle that fits your drawing idea.
Use Horizon Line And Vanishing Points
The horizon line is where the sky meets the land. Place it high or low to change the mountain’s look.
Vanishing points help draw the mountain’s sides correctly. They guide how lines move away from the viewer.
- Place horizon line near the top for a steep view
- Put horizon line near the bottom for a shallow view
- Use vanishing points to keep shapes proportional
Consider Scale And Proportion
Scale shows how big the mountain is compared to other objects. Use small trees or houses for size reference.
Proportion keeps the mountain parts balanced. The peak, slopes, and base should look natural from above.
- Draw the peak smaller than the base
- Make slopes wider near the bottom
- Add details like paths or rocks for scale
Sketching The Basic Shapes
Drawing a bird eye view of mountains starts with simple shapes. These shapes help build the overall look.
Focus on the large forms first before adding details. This makes the drawing easier and clearer.
Start With Triangles For Peaks
Mountains seen from above look like many triangles. These triangles show each peak.
Draw different sizes to show distance and height. Big triangles are closer mountains.
Use Ovals For Hill Tops
Not all mountains are sharp. Some have round hilltops. Sketch ovals to show these shapes.
Place ovals near triangles to mix sharp and soft mountain forms. This adds variety to your sketch.
Draw Lines For Ridges And Valleys
Connect the basic shapes with lines. These lines show ridges and valleys between peaks.
Use curved or straight lines depending on the mountain shape. This adds depth to the sketch.
- Draw ridges as lines going down from peaks
- Valleys appear as lines curving between shapes
- Lines help guide where shadows and details go
Add Basic Shapes For Surrounding Features
Sketch circles or rectangles for lakes, trees, or buildings near mountains. This shows context.
Keep shapes simple to avoid clutter. These forms help place the mountains in a bigger scene.

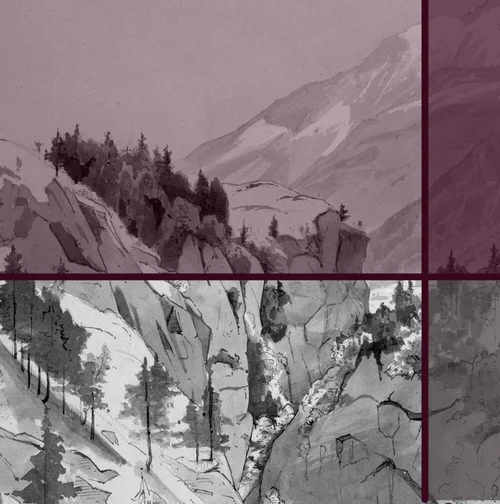
Credit: www.freepik.com
Adding Mountain Details
Adding details to a bird eye view mountain makes your drawing look real. Small touches bring the mountain to life.
Focus on shapes and textures to show the mountain’s form and surface. This guide helps you add peaks, ridges, and texture.
Drawing Peaks And Ridges
Peaks and ridges create the mountain’s shape. Use sharp lines for peaks and softer lines for ridges. Vary their size and angle for a natural look.
- Draw pointed triangles for sharp peaks.
- Use curved lines to show smooth ridges.
- Overlap ridges for depth and layering.
- Add shadows on one side for light direction.
- Keep some edges jagged to show rough terrain.
Creating Texture And Depth
Texture shows the mountain’s surface. Depth gives a 3D feel. Use shading and small marks to add both.
| Technique | Effect |
| Cross-hatching | Shows rough, rocky surface |
| Stippling | Adds grainy texture for dirt |
| Gradient shading | Creates smooth depth and shadow |
| Contour lines | Follows mountain shape for volume |
Incorporating Surrounding Elements
Drawing a bird eye view mountain is more interesting with surrounding details. These elements give depth and context. They help viewers understand the landscape better.
Adding forests, trees, rivers, and lakes around your mountain creates a natural scene. This guide explains how to include these elements well.
Forests And Trees
Forests and trees add texture and life to your bird eye view mountain. Use small shapes to show tree tops and different shades of green. This shows the density of the forest.
- Draw clusters of small circles or ovals for tree tops.
- Vary the size of trees to show distance.
- Use darker greens near the mountain base.
- Light greens show trees on higher slopes.
- Add small clearings to break the forest pattern.
Rivers And Lakes
Rivers and lakes bring movement and calmness to your mountain view. They reflect light and add blue tones to the scene. Place rivers flowing from the mountain downwards.
| Feature | Drawing Tips |
| Rivers | Use curved lines that get thinner as they flow down |
| Lakes | Draw smooth oval or round shapes with light blue color |
| Reflection | Add white or lighter blue streaks on water surface |
| Surrounding Plants | Include small green patches near water edges |
Shading Techniques
Shading adds depth and shape to your bird eye view mountain drawing. It helps show the mountain’s peaks and valleys clearly.
Good shading makes your drawing look real and gives it more interest. You can use simple tools like pencils or digital brushes.
Light Source And Shadows
Decide where the light is coming from before shading. The light source affects where shadows fall on the mountain.
Shadows show the parts of the mountain that the light does not reach. They create contrast and form.
- Choose a clear light direction, like top left or right.
- Shade the opposite side darker to show shadow.
- Use lighter shading near the light source.
- Include small shadows under ridges and crevices.
Blending For Realism
Blending smooths the shading to avoid harsh lines. It makes the mountain look soft and natural.
Use a blending tool, finger, or soft brush to gently mix the shaded areas. This creates smooth color changes.
- Start with light pressure to blend softly.
- Blend edges between light and shadow carefully.
- Keep some sharp lines for rock edges.
- Layer shading and blend multiple times for depth.
Coloring Tips
Coloring your bird eye view mountain drawing can bring it to life. The right colors add depth and interest to your art.
Use simple techniques to make your mountain look realistic from above. This guide gives easy coloring tips to help you.
Choosing A Color Palette
Pick colors that show the natural look of mountains from above. Greens, browns, and blues work well for this view.
Think about the time of day and season. This affects the colors you choose for shadows and highlights.
- Use dark green and brown for trees and rocks
- Add light green or yellow for grass and fields
- Use blues and whites for snow and sky reflections
- Include gray or dark blue for shaded mountain areas
Layering Colors
Apply colors in layers to create depth. Start with light colors, then add darker shades on top.
Use small strokes or dots to mix colors smoothly. This helps show texture and the mountain’s shape.
- Begin with a base color for each area
- Add mid-tone colors to show details
- Use dark colors for shadows and edges
- Blend colors softly for a natural look

Credit: www.freepik.com
Final Touches
Adding final touches improves your bird eye view mountain drawing. These steps bring depth and realism.
Focus on light, shadow, and fine details to make the mountain look natural and complete.
Adding Highlights
Highlights show where light hits the mountain peaks. They add contrast and shape to your drawing.
- Use a lighter color to paint the sunlit areas on the mountain.
- Apply highlights on ridges and steep slopes facing the light source.
- Keep highlights soft to blend naturally with shadows.
- Avoid overdoing highlights to maintain balance.
Refining Details
Details make your mountain look realistic. Small textures and shapes add depth and interest.
| Detail Type | Purpose | Tips |
| Rock Textures | Show rough surfaces | Use short, sharp strokes |
| Tree Clusters | Add scale and life | Draw small dark shapes near slopes |
| Snow Patches | Indicate cold areas | Apply white or light blue softly |
| Shadow Lines | Define mountain edges | Use darker tones along crevices |
Frequently Asked Questions
How Do I Start Drawing A Bird Eye View Mountain?
Begin with a rough outline of the mountain’s shape from above. Sketch basic contours and peaks. Use light pencil strokes to adjust proportions easily.
What Tools Are Best For Drawing Bird Eye View Mountains?
Use pencils for initial sketches and fine liners for details. Watercolors or markers add depth and texture. Digital tools like tablets work well too.
How Can I Add Depth To Bird Eye View Mountain Drawings?
Add shadows and highlights to show elevation changes. Use darker tones for valleys and lighter shades for peaks. This creates a realistic 3D effect.
What Perspective Should I Use For Bird Eye View Mountains?
Use a top-down perspective focusing on the mountain’s shape and terrain. Avoid side views; emphasize the layout and contours seen from above.
Conclusion
Drawing a bird’s eye view of a mountain is fulfilling. With practice, your skills will improve over time. Remember to focus on perspective. It adds depth to your artwork. Use light and shadow for more realism. Sketching regularly helps you gain confidence.
Nature offers endless inspiration. Observe different mountains and capture their unique features. Always keep a sketchbook handy. Let your creativity flow freely. Enjoy the process and have fun. Soon, you’ll create stunning mountain views. Keep practicing and learning. Your art will speak for itself.
Happy drawing!