
Have you ever watched a bird soar through the sky and wished you could capture that perfect moment? Bird photography in flight is one of the most exciting and rewarding challenges you can take on.
It pushes your skills and patience, but the thrill of freezing a bird mid-air makes it all worth it. You’ll discover simple tips and tricks to help you snap stunning flight photos that will impress everyone. Ready to take your bird photography to new heights?
Let’s dive in and make those breathtaking shots happen.
Gear Essentials
Bird photography in flight is exciting but needs the right gear. Good equipment helps capture sharp and clear images of flying birds.
Choosing the best camera, lens, and support tools is key. This guide covers the essentials for bird flight photography gear.
Best Cameras For Bird Flight
A fast camera with quick focus is important for bird flight shots. It helps catch birds in sharp detail while they move.
Cameras with high frame rates capture many photos fast. This increases the chance of a perfect bird flight picture.
- DSLR or mirrorless cameras work well
- Look for 10+ frames per second shooting speed
- Fast autofocus systems help track moving birds
- Good low-light performance is useful outdoors
Choosing The Right Lens
Telephoto lenses are best to photograph birds in flight. They let you zoom in from a distance without disturbing the bird.
Look for lenses with fast autofocus and image stabilization. These features help keep flying birds sharp in your photos.
- Use lenses 300mm or longer for close-up shots
- Fast apertures like f/4 or f/5.6 improve shutter speed
- Image stabilization reduces blur from camera shake
- Zoom lenses offer flexibility in framing
Tripods And Stabilizers
Tripods help keep your camera steady for sharp images. They are useful for heavy lenses and long shooting sessions.
Stabilizers like monopods give support but allow quick movement. They help follow fast flying birds smoothly.
- Use sturdy tripods for stability
- Monopods improve mobility and reduce fatigue
- Choose gear that is easy to carry outdoors
- Head mounts help track moving birds smoothly
Credit: www.onthewingphotography.com
Camera Settings
Bird photography in flight needs the right camera settings. The correct setup helps capture sharp, clear photos.
Adjusting shutter speed, aperture, ISO, and focus can improve your flying bird shots.
Shutter Speed Tips
Fast shutter speed freezes bird movement in flight. Use speeds of 1/1000 second or faster.
If light is low, increase ISO to keep fast shutter speed. Avoid slower speeds to stop blur.
- Try 1/2000 second for small, fast birds
- Use 1/1000 second for larger birds
- Use burst mode to capture multiple shots
Aperture And Iso Choices
Aperture controls how much light enters the lens and the depth of field. Use f/5.6 to f/8 for sharp birds and some background blur.
ISO controls your camera’s sensitivity to light. Use the lowest ISO that keeps your shutter speed fast.
- Set aperture between f/5.6 and f/8 for good focus
- Increase ISO in low light to keep fast shutter speed
- Watch for noise at high ISO settings
Focus Modes For Moving Birds
Use continuous autofocus (AF-C) to track birds in flight. This mode keeps the focus moving with the bird.
Use multiple focus points or zone focus to cover more area. This helps keep fast birds sharp as they move.
- Set camera to AF-C or AI Servo mode
- Use zone or group focus points
- Practice tracking birds before shooting
Techniques For Capturing Flight
Bird photography in flight is exciting but challenging. You need special skills to capture sharp images.
Good techniques help you follow birds and get clear, beautiful photos of them flying.
Tracking Fast Movements
Birds fly quickly and change direction fast. Tracking their movement keeps them in focus.
Use continuous autofocus on your camera. This helps keep the bird sharp while it moves.
- Set your camera to AI Servo or AF-C mode
- Hold the camera steady and follow the bird smoothly
- Practice following the bird before taking photos
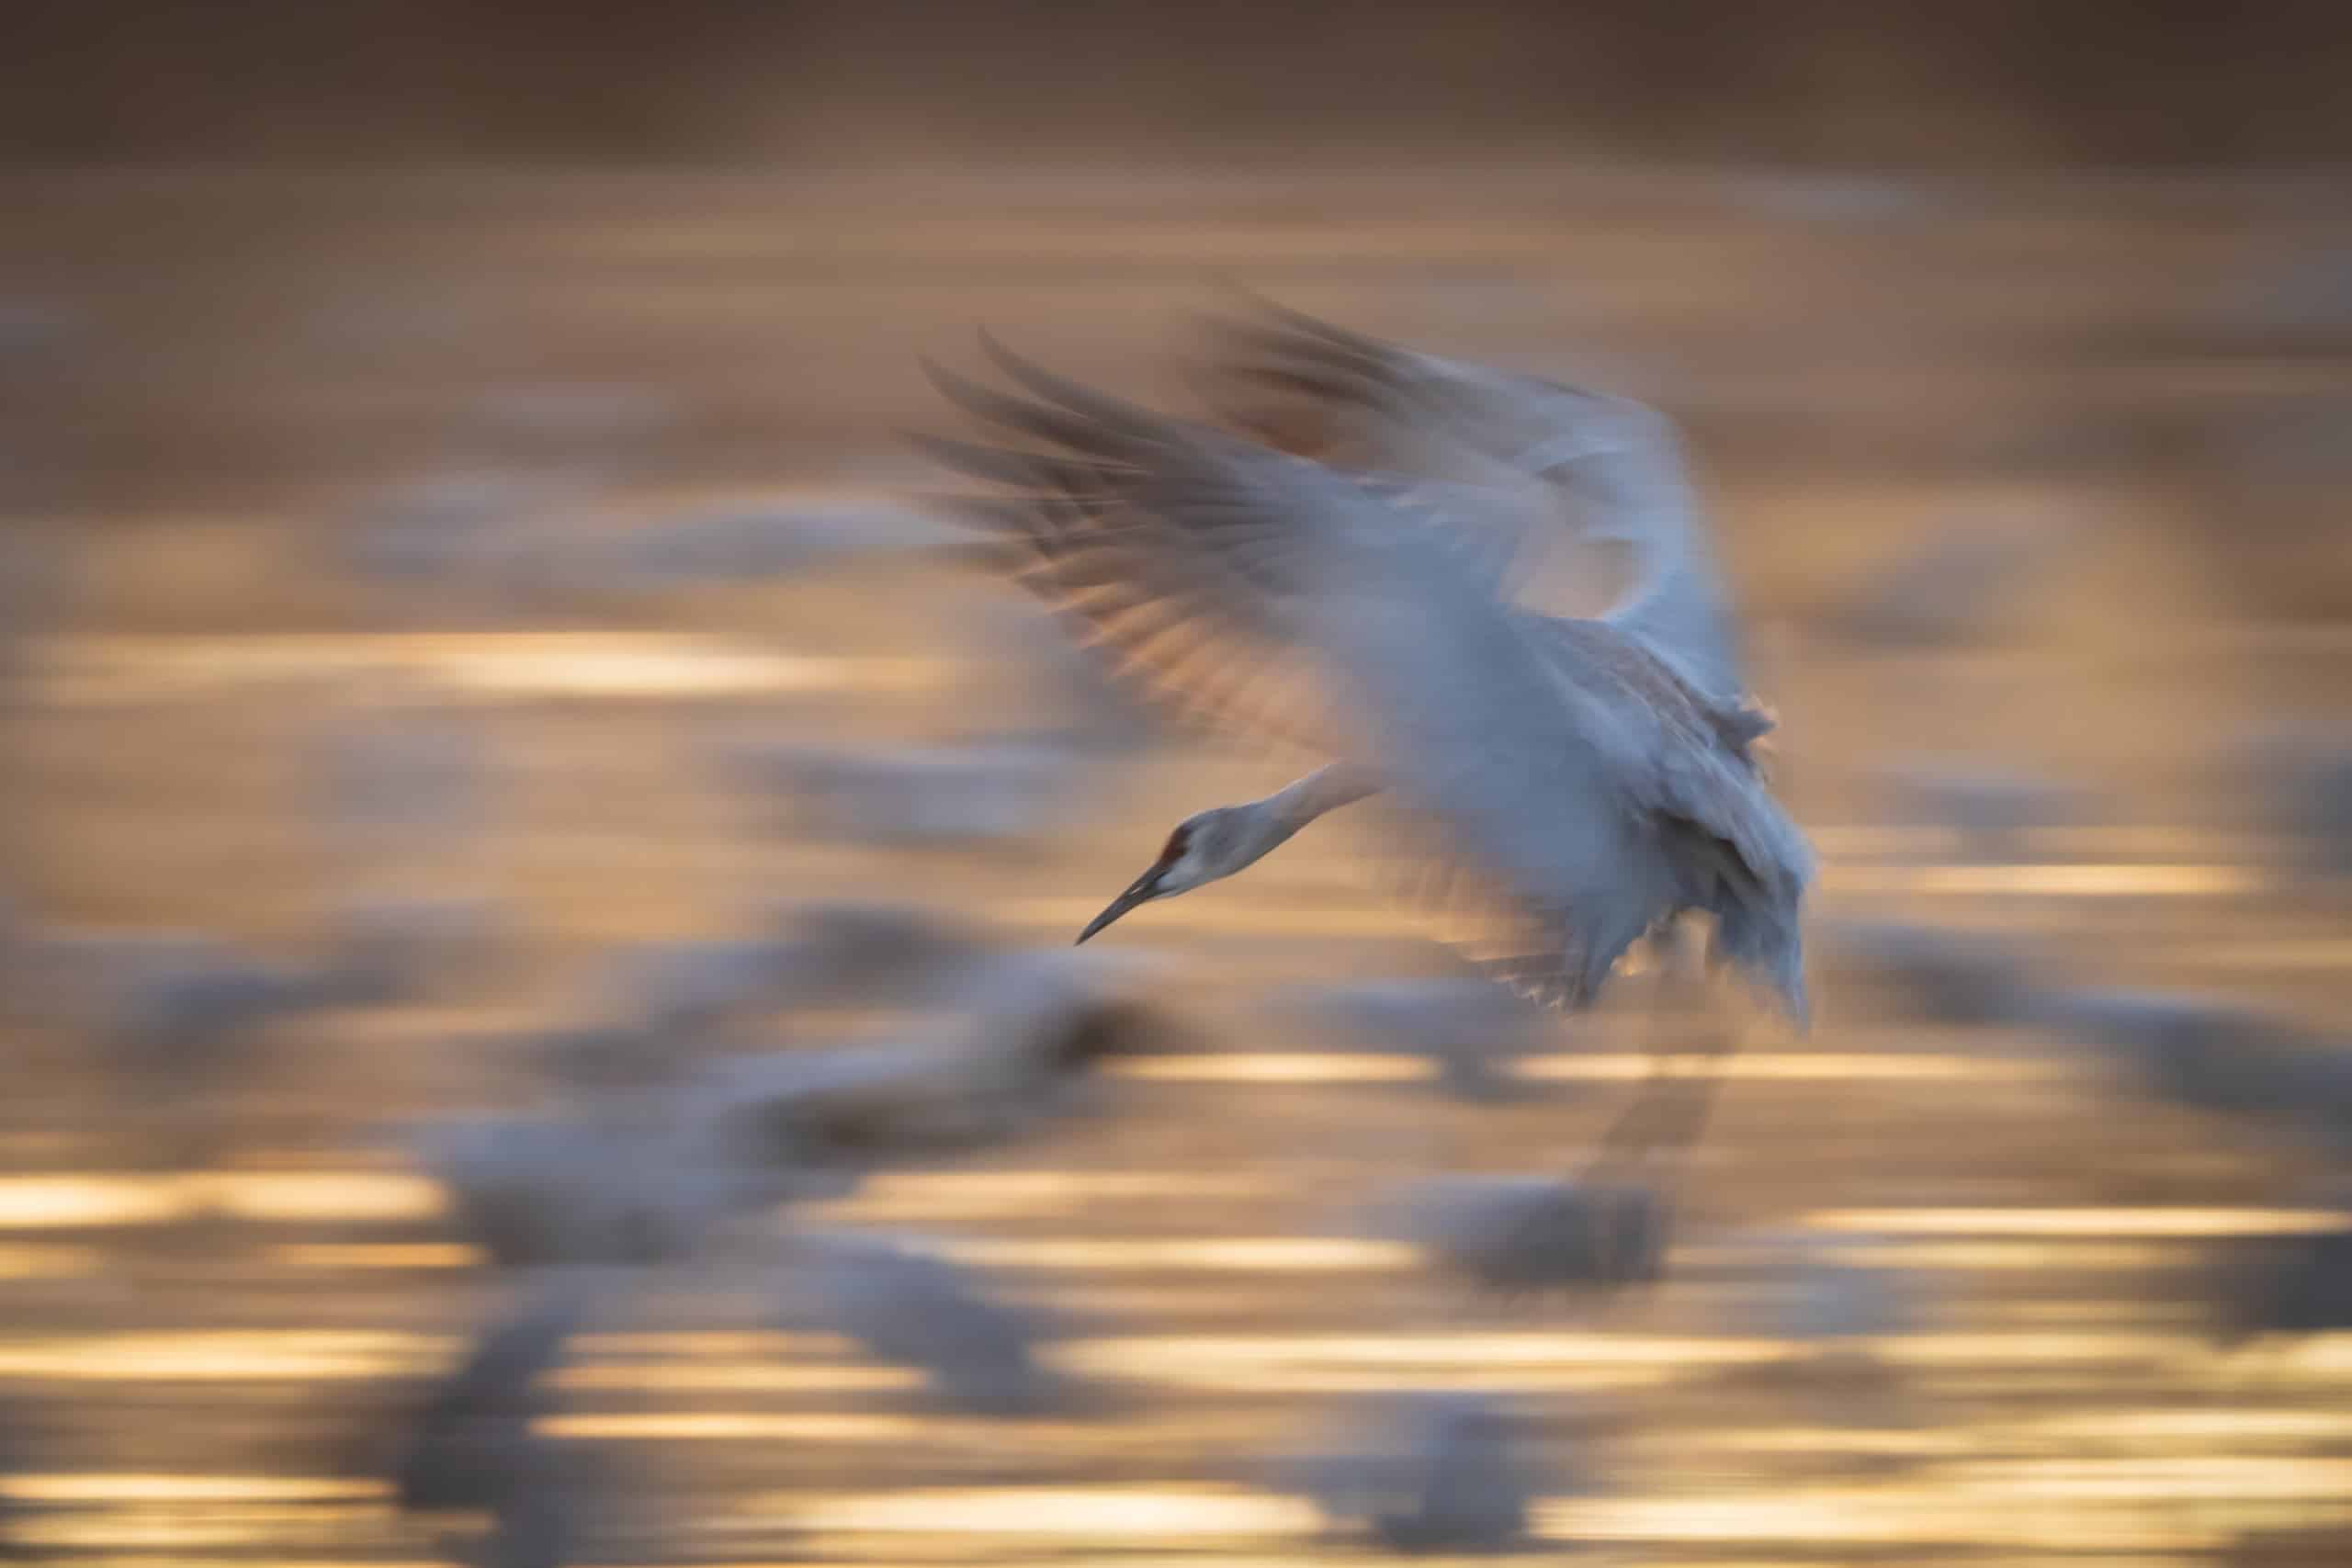
Panning For Dynamic Shots
Panning means moving the camera along with the bird’s flight path. This creates a sharp subject with a blurred background.
Move your camera smoothly while pressing the shutter. This shows motion and speed in the photo.
- Use a slower shutter speed, like 1/60 to 1/125 second
- Keep the bird centered while moving the camera
- Practice panning to get smoother movements
Timing Your Shots Perfectly
Good timing captures the bird at the best moment, like wings spread or in action.
Watch the bird’s behavior and be ready to press the shutter at key moments.
- Use burst mode to take many photos quickly
- Focus on moments like takeoff, landing, or turns
- Stay patient and watch the bird closely
Credit: www.featheredphotography.com
Lighting And Composition
Bird photography in flight is exciting and challenging. Good lighting and composition help make sharp, beautiful pictures.
Knowing how to use light and frame your subject can improve your photos a lot. This guide covers key tips on these topics.
Using Natural Light
Natural light shows birds in their true colors. Early morning and late afternoon give soft, warm light that adds depth.
Avoid harsh midday sun because it creates strong shadows and bright spots. Overcast days work well for even lighting.
- Shoot during golden hours for warm tones
- Keep the sun behind you to light the bird
- Use cloudy days for soft, diffused light
Background Selection
Choose simple backgrounds to keep focus on the bird. A plain sky or blurred trees work best.
Busy backgrounds distract the viewer and can hide details. Use a wide aperture to blur the background and highlight the bird.
- Pick a clear sky or smooth background
- Use shallow depth of field to blur the back
- Avoid backgrounds with bright colors or clutter
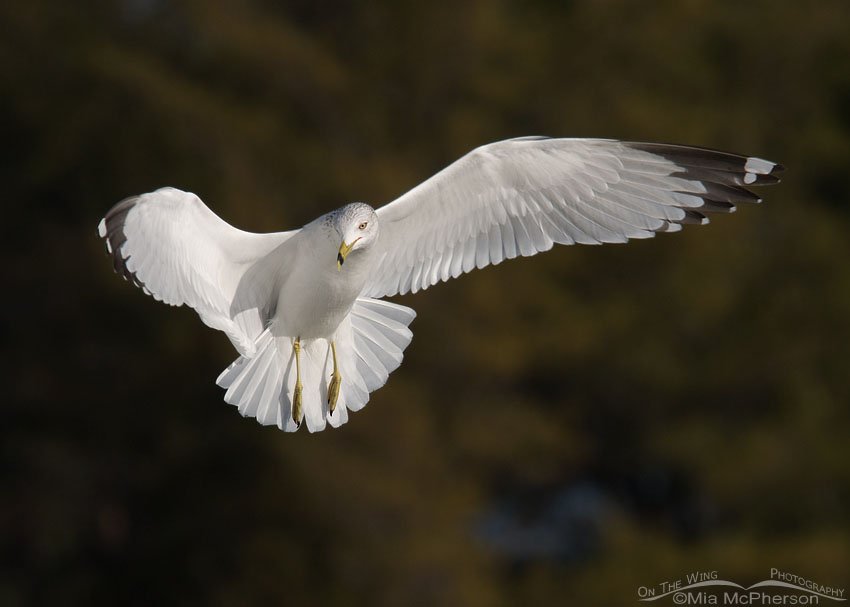
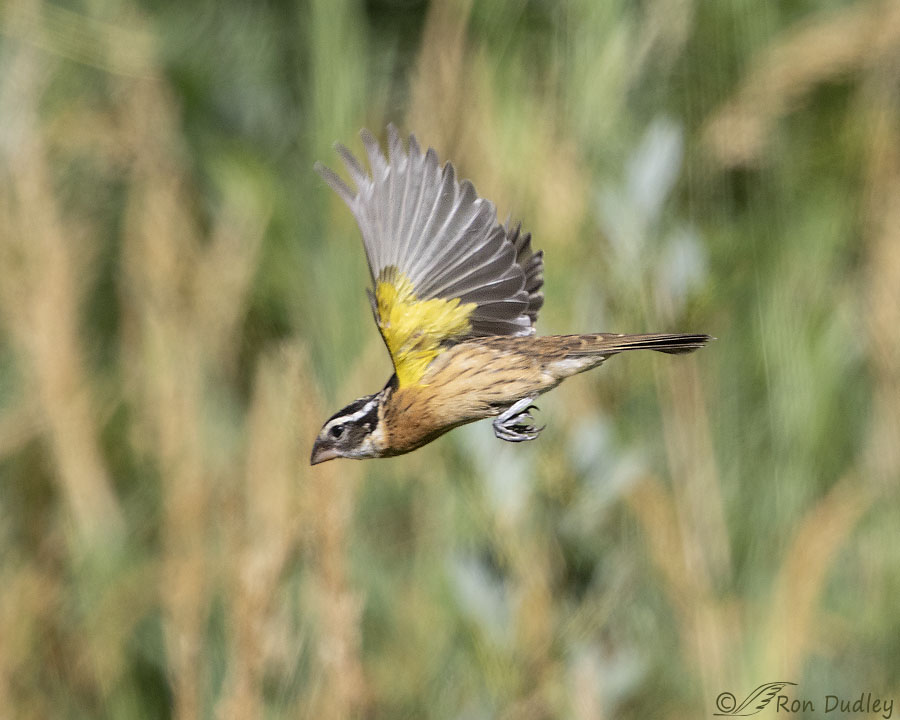
Framing Birds In Action
Frame the bird with enough space in front. This gives a sense of movement and direction.
Keep the bird sharp and centered or slightly off-center. Include wings or tail for dynamic shots.
- Leave space ahead of the bird for movement
- Focus on the eyes for clear expression
- Capture wings fully spread for action
Post-processing Tips
Editing bird photos taken in flight helps show their beauty. Post-processing makes images sharper and clearer.
Small changes can improve focus, colors, and framing. These tips help you enhance your bird flight photos.
Enhancing Details
Bring out fine details like feathers and eyes. Use sharpening tools carefully to avoid noise.
Adjust clarity and texture sliders to highlight feather patterns. Avoid overdoing to keep a natural look.
- Use selective sharpening on the bird only
- Reduce noise in background areas
- Increase texture to reveal feather details
- Check zoomed view to avoid artifacts
Cropping For Impact
Crop images to focus on the bird in flight. Remove distractions and improve composition.
Use the rule of thirds to place the bird off-center. Leave space in front for movement direction.
- Crop tight to remove empty sky or ground
- Keep wing tips inside the frame
- Leave breathing room where the bird flies
- Try different crop ratios like 4:5 or 16:9
Color Correction Tricks
Fix colors to make the bird look natural and vivid. Adjust white balance to correct color casts.
Boost contrast and saturation lightly. Avoid colors that look too fake or harsh.
- Adjust temperature for warmer or cooler tones
- Increase vibrance instead of saturation for subtle color
- Use selective color tools to enhance feathers
- Check colors on different screens for accuracy

Credit: digital-photography-school.com
Common Challenges
Bird photography in flight is exciting but tough. Many challenges make it hard to get clear shots.
Understanding these common problems helps photographers prepare and improve their skills.
Dealing With Motion Blur
Birds move fast, causing motion blur in photos. This blur happens when the shutter speed is too slow.
Using a fast shutter speed helps freeze the bird's motion and capture sharp images.
- Use shutter speeds of 1/1000 second or faster
- Increase ISO if light is low to keep fast speeds
- Use burst mode to take many shots quickly
Handling Unpredictable Flight Patterns
Birds do not fly in straight lines. Their sudden turns and dives make it hard to track them.
Photographers must stay alert and anticipate the bird’s next move to keep it in the frame.
- Practice following birds with your camera
- Use continuous autofocus to keep focus on the bird
- Choose birds that fly in open spaces for easier tracking
Weather Considerations
Weather affects lighting and bird behavior. Bright sun, rain, or wind can change photo quality.
Photographers should check weather before shooting and adjust settings for different conditions.
- Sunny days give good light but may cause harsh shadows
- Cloudy days offer soft light, reducing shadows
- Wind can make birds fly more erratically
- Rain needs waterproof gear to protect your camera
Practice And Patience
Bird photography in flight is a skill that takes time to develop. It needs both practice and patience.
Birds move fast and unpredictably, so photographers must stay calm and keep trying.
Building Observation Skills
Watching birds closely helps you know when they will take flight. This improves your chances to capture good shots.
Observe their movements, wing patterns, and how they react to surroundings. This skill grows with regular practice.
- Spend time quietly near bird habitats
- Notice how birds prepare to fly
- Practice tracking birds with your eyes
Learning Bird Behavior
Understanding bird behavior helps you predict their actions. This knowledge leads to better photo timing.
Each species has unique habits. Learn about feeding, flying times, and rest patterns to improve your shots.
- Research common bird species in your area
- Note when birds are most active
- Watch how birds interact with each other
Setting Realistic Goals
Set small and clear goals for each photo session. This keeps you motivated and focused on improvement.
Start with capturing clear flight shapes before aiming for perfect focus or lighting. Celebrate small successes.
- Plan to capture a few good shots per session
- Work on improving focus and sharpness over time
- Review your photos to see progress
Frequently Asked Questions
How Do You Photograph Birds In Flight?
Photographing birds in flight requires patience and practice. Use a fast shutter speed to capture sharp images. Track the bird's movements and anticipate its actions. Utilize continuous autofocus to maintain focus as the bird moves. Practice often and learn the birds' behaviors for better results.
What Camera Settings Are Best For Bird Photography?
For bird photography, use a fast shutter speed, ideally 1/1000s or faster. Set your aperture between f/5. 6 and f/8 for a balanced depth of field. Use a high ISO, around 400-800, to ensure proper exposure. Adjust these settings based on lighting conditions and your camera's capabilities.
Which Lens Is Ideal For Bird Photography?
A telephoto lens, ideally 300mm or longer, is best for bird photography. It allows you to capture distant birds without disturbing them. A lens with image stabilization helps reduce motion blur. Consider a zoom lens for versatility in capturing birds at varying distances.
How Can I Improve My Bird Photography Skills?
Improving bird photography skills involves practice and patience. Study bird behavior to anticipate their movements. Experiment with different camera settings and compositions. Join bird photography groups for tips and feedback. Review and learn from your photos to understand what works and what doesn't.
Conclusion
Capturing birds in flight takes patience and practice. Use your camera settings to freeze motion clearly. Watch the bird’s movement and anticipate its next move. Lighting plays a big role in sharp, bright photos. Stay quiet and blend into your surroundings.
Enjoy the challenge and the beauty of nature. Each photo tells a story of flight and freedom. Keep trying, and your skills will improve over time. Bird photography in flight offers a rewarding experience for all skill levels.


