How to Build a Bird Roosting Box: Easy Steps for Perfect…
Have you ever wanted to bring more life and color to your backyard? Building a bird roosting box is a simple way to invite beautiful birds to rest safely near you. Imagine waking up to cheerful bird songs every morning, knowing you helped create a cozy home for them. In this guide, you’ll discover easy steps to build your own bird roosting box, even if you’ve never worked with wood before. Keep reading, and soon you’ll have a welcoming space that attracts feathered friends and adds charm to your outdoor space.
Choosing The Right Materials
Building a bird roosting box needs careful material choice. Good materials keep birds safe and comfortable. Use strong, natural, and non-toxic materials to make a long-lasting bird box. How to Build a Bird Roosting Box effectively begins with selecting the right foundation for your structure.
Selecting Safe Wood
Wood is the best material for bird boxes. It stays warm and dry for birds inside.
Choose untreated wood without chemicals. Avoid wood that can rot fast or harm birds.
- Cedar wood is strong and naturally resists bugs
- Pine is easy to find but may need extra care
- Avoid pressure-treated or painted wood
- Use wood at least ¾ inch thick for good insulation
Gathering Tools And Supplies
Collect the right tools before starting. This helps build the box safely and quickly.
Basic tools and supplies include wood, nails, screws, and sandpaper.
- Saw to cut wood pieces
- Hammer or screwdriver for nails and screws
- Drill to make entrance holes
- Sandpaper to smooth rough edges
- Measuring tape and pencil for accuracy
Credit: www.harrowsmithmag.com
Designing Your Roosting Box
Building a bird roosting box starts with a good design. The box must be safe and comfortable for birds. Focus on the size, shape, and features that help birds stay warm and dry. Determining how to build a bird roosting box that fits specific species ensures that the inhabitants remain protected during winter.
Ideal Size And Shape
The box should fit the type of bird you want to attract. It needs enough space for the bird to move but not too large.
- Height: 10 to 15 inches
- Width: 6 to 8 inches
- Depth: 6 to 8 inches
- Entrance hole diameter: 1 to 2 inches
- Flat or slightly sloped roof
Ventilation And Drainage Features
Good airflow and water drainage keep the box dry and safe. Birds need fresh air but must stay warm.
| Feature | Description |
| Ventilation holes | Small holes near the top for airflow |
| Drainage holes | Openings at the bottom to drain rainwater |
| Overhanging roof | Prevents rain from entering the box |
| Water-resistant materials | Use wood or treated surfaces |
Cutting And Preparing Pieces
Building a bird roosting box starts with cutting the wood pieces correctly. Preparing the pieces well ensures the box fits tightly. Accurate cuts help birds stay safe and dry. Use the right tools and take your time measuring and marking each piece. When researching birds attracted to moving water garden features, many enthusiasts find that placing a roosting box nearby increases the chances of occupancy. Careful preparation makes assembling the box easier and stronger.
Measuring And Marking
Measure the wood carefully before cutting. Use a tape measure or ruler to get exact lengths. Mark each cut line clearly with a pencil.
- Double-check your measurements to avoid mistakes.
- Mark all edges so you know where to cut.
- Use a square tool to keep lines straight and square.
- Label each piece if needed to keep parts organized.
Cutting Wood Accurately
Cut the wood along the marked lines using a saw. Keep your cuts steady and straight to fit pieces well together.
| Tool | Best Use | Tips |
|---|---|---|
| Hand Saw | Small cuts, easy to control | Use slow, steady strokes |
| Jigsaw | Curved or detailed cuts | Guide slowly along the line |
| Circular Saw | Long straight cuts | Clamp wood firmly before cutting |

Credit: homefixated.com
Assembling The Box
Building a bird roosting box means putting all parts together carefully. This helps birds feel safe and comfortable inside. We will look at how to join the walls and floor, then secure the roof and entrance. How to Build a Bird Roosting Box properly requires attention to the tight seals between panels to prevent drafts.
Joining Walls And Floor
Start by lining up the walls so their edges meet evenly. Use wood glue on the edges for a strong hold.
Next, attach the floor piece to the bottom edges of the walls. Make sure it fits snugly and is level.
- Apply wood glue to wall edges
- Press walls together firmly
- Use nails or screws to secure corners
- Attach floor with glue and nails
- Check that floor is flat and fits well
Securing Roof And Entrance
Place the roof on top of the walls so it overhangs a little. This helps protect the box from rain.
Fix the roof with screws or nails. Make sure it is stable and does not move easily.
The entrance hole should be smooth and safe. Sand the edges to avoid sharp wood splinters.
- Position roof with slight overhang
- Secure roof using screws or nails
- Sand entrance hole edges smooth
- Check roof stability after securing
Finishing Touches
After building the bird roosting box, the final steps make it safe and durable. These finishing touches help protect the wood and keep birds comfortable. Focus on sanding the edges and applying a sealant. Understanding moving water bird garden dynamics can help you decide if you should add a protective sealant to withstand extra moisture in the area. These steps improve the box’s look and lifespan.
Sanding And Smoothing Edges
Use sandpaper to smooth all rough parts of the box. This removes splinters that can hurt birds.
Pay attention to corners and entrance holes. Make sure edges feel soft and safe to touch.
- Start with coarse sandpaper to remove big rough spots
- Use finer sandpaper to smooth the surface
- Check every edge and corner carefully
- Sand inside holes and around openings
Applying Non-toxic Sealants
Choose a sealant safe for birds and the environment. Non-toxic sealants protect wood from rain and sun.
Apply sealant evenly and let it dry well. This helps the box last longer outside.
- Pick water-based, non-toxic wood sealants
- Apply with a brush or cloth in thin coats
- Let each coat dry before adding another
- Seal all outer surfaces, including roof and edges
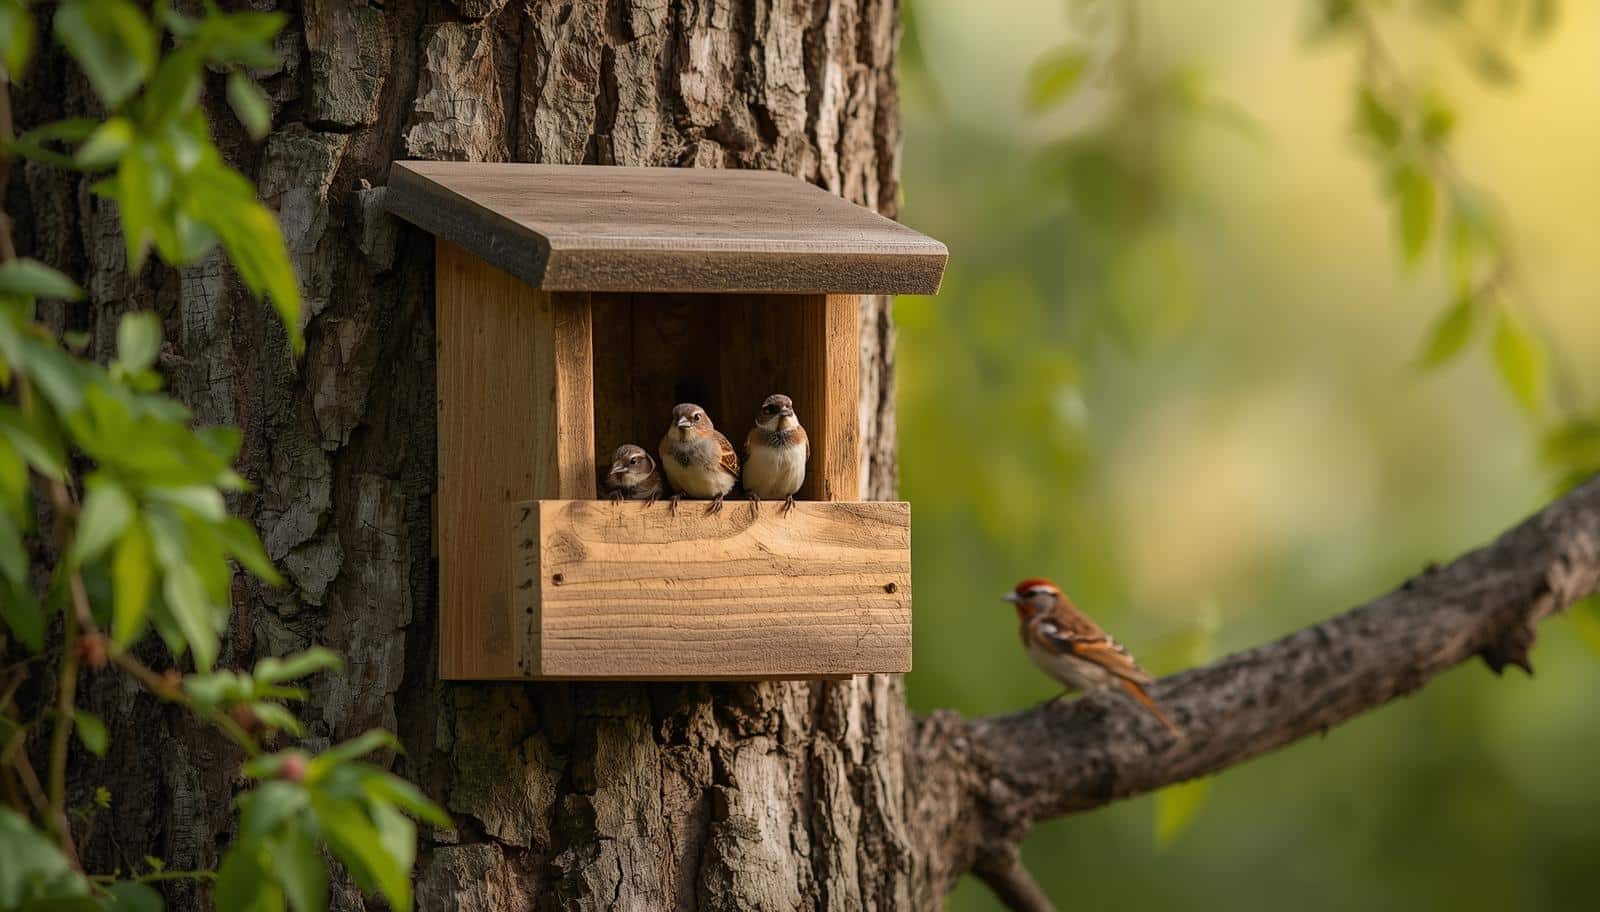
Placing The Roosting Box
Placing the bird roosting box correctly helps birds stay safe and warm. A good spot keeps the box dry and away from predators. Think about the environment and the birds’ needs before mounting the box. Creating a bird friendly countryside garden requires careful placement of shelters to mimic natural nesting hollows. This helps birds use the box more often.
Choosing A Safe Location
Pick a quiet place with little human activity. Avoid areas near busy roads or loud machines.
Look for spots that are sheltered from strong winds and direct sunlight. Trees or walls can provide good protection.
- Place the box 5 to 10 feet above ground
- Keep it away from bird feeders to reduce crowding
- Choose a location that faces away from prevailing winds
- Avoid spots near windows to prevent bird collisions
Mounting Tips For Stability
Use strong materials like screws or brackets to fix the box in place. This stops the box from falling in bad weather.
Make sure the box does not wobble or tilt. A steady box feels safer to birds and lasts longer.
- Mount the box on a sturdy tree or post
- Check the box regularly for loose parts
- Add a small roof overhang to protect from rain
- Use a level tool to keep the box straight
Maintaining The Shelter
Keeping a bird roosting box clean and safe helps birds stay healthy. Regular care extends the life of the shelter. It also encourages birds to return each year. This guide covers two key tasks: regular cleaning and seasonal inspections. Integrating your shelter near a fountain can help, as many birds attracted to fountains will naturally find the nearby roosting box during their visits. Both are important for a well-maintained roosting box.
Regular Cleaning
Cleaning the roosting box removes dirt, old nests, and parasites. This keeps the birds safe from diseases.
- Wear gloves to protect your hands.
- Remove old nesting material carefully.
- Use a mild soap and water solution to wash the inside.
- Rinse well and let the box dry completely.
- Do not use harsh chemicals or pesticides.
- Clean the box at the end of the breeding season.
Seasonal Inspections
Inspect the box each season to check for damage or wear. Fix problems early to keep the shelter safe.
| Inspection Item | What to Check | Action Required |
| Roof | Leaks or loose panels | Seal gaps or replace panels |
| Entrance Hole | Blockages or damage | Clear debris or smooth edges |
| Mounting | Stability and secure attachments | Tighten screws or adjust mounts |
| Ventilation | Openings clear and functional | Remove obstructions |
| Predator Guards | Intact and strong | Repair or replace guards |

Credit: www.youtube.com
Frequently Asked Questions – Bird Roosting Boxes
What Materials Do I Need For A Bird Roosting Box?
To build a box, use untreated wood, screws, and nails. Gather a saw, drill, and measuring tape. Pick weather‑resistant materials for durability. Add ventilation and drainage holes. Include a hinged lid for cleaning and observation.
How Do I Choose The Right Location For The Box?
Select a quiet spot away from predators. Face the box away from strong winds. Mount it securely on a tree or post. Place it at least 6 feet above ground. A shaded area helps regulate temperature inside.
Why Are Bird Roosting Boxes Important?
Roosting boxes give shelter from harsh weather. They provide safe resting spaces and protection from predators. In winter, they help birds conserve energy. They also support biodiversity by aiding local bird populations.
How Can I Attract Birds To The Roosting Box?
Place bird feeders and birdbaths nearby. Keep the box clean and pest‑free. Use natural materials inside for insulation. Avoid frequent disturbance. Plant native shrubs and trees to create a welcoming habitat.
Conclusion
Building a bird roosting box helps birds stay safe and warm. It also brings nature closer to your home. Use simple materials and follow easy steps. Place the box where birds feel secure. Watch as birds enjoy their new shelter. This small effort supports local wildlife daily. Learning how to build a bird roosting box is a rewarding project anyone can do. Give birds a cozy place to rest this season. You’ll enjoy seeing them gather and thrive.