
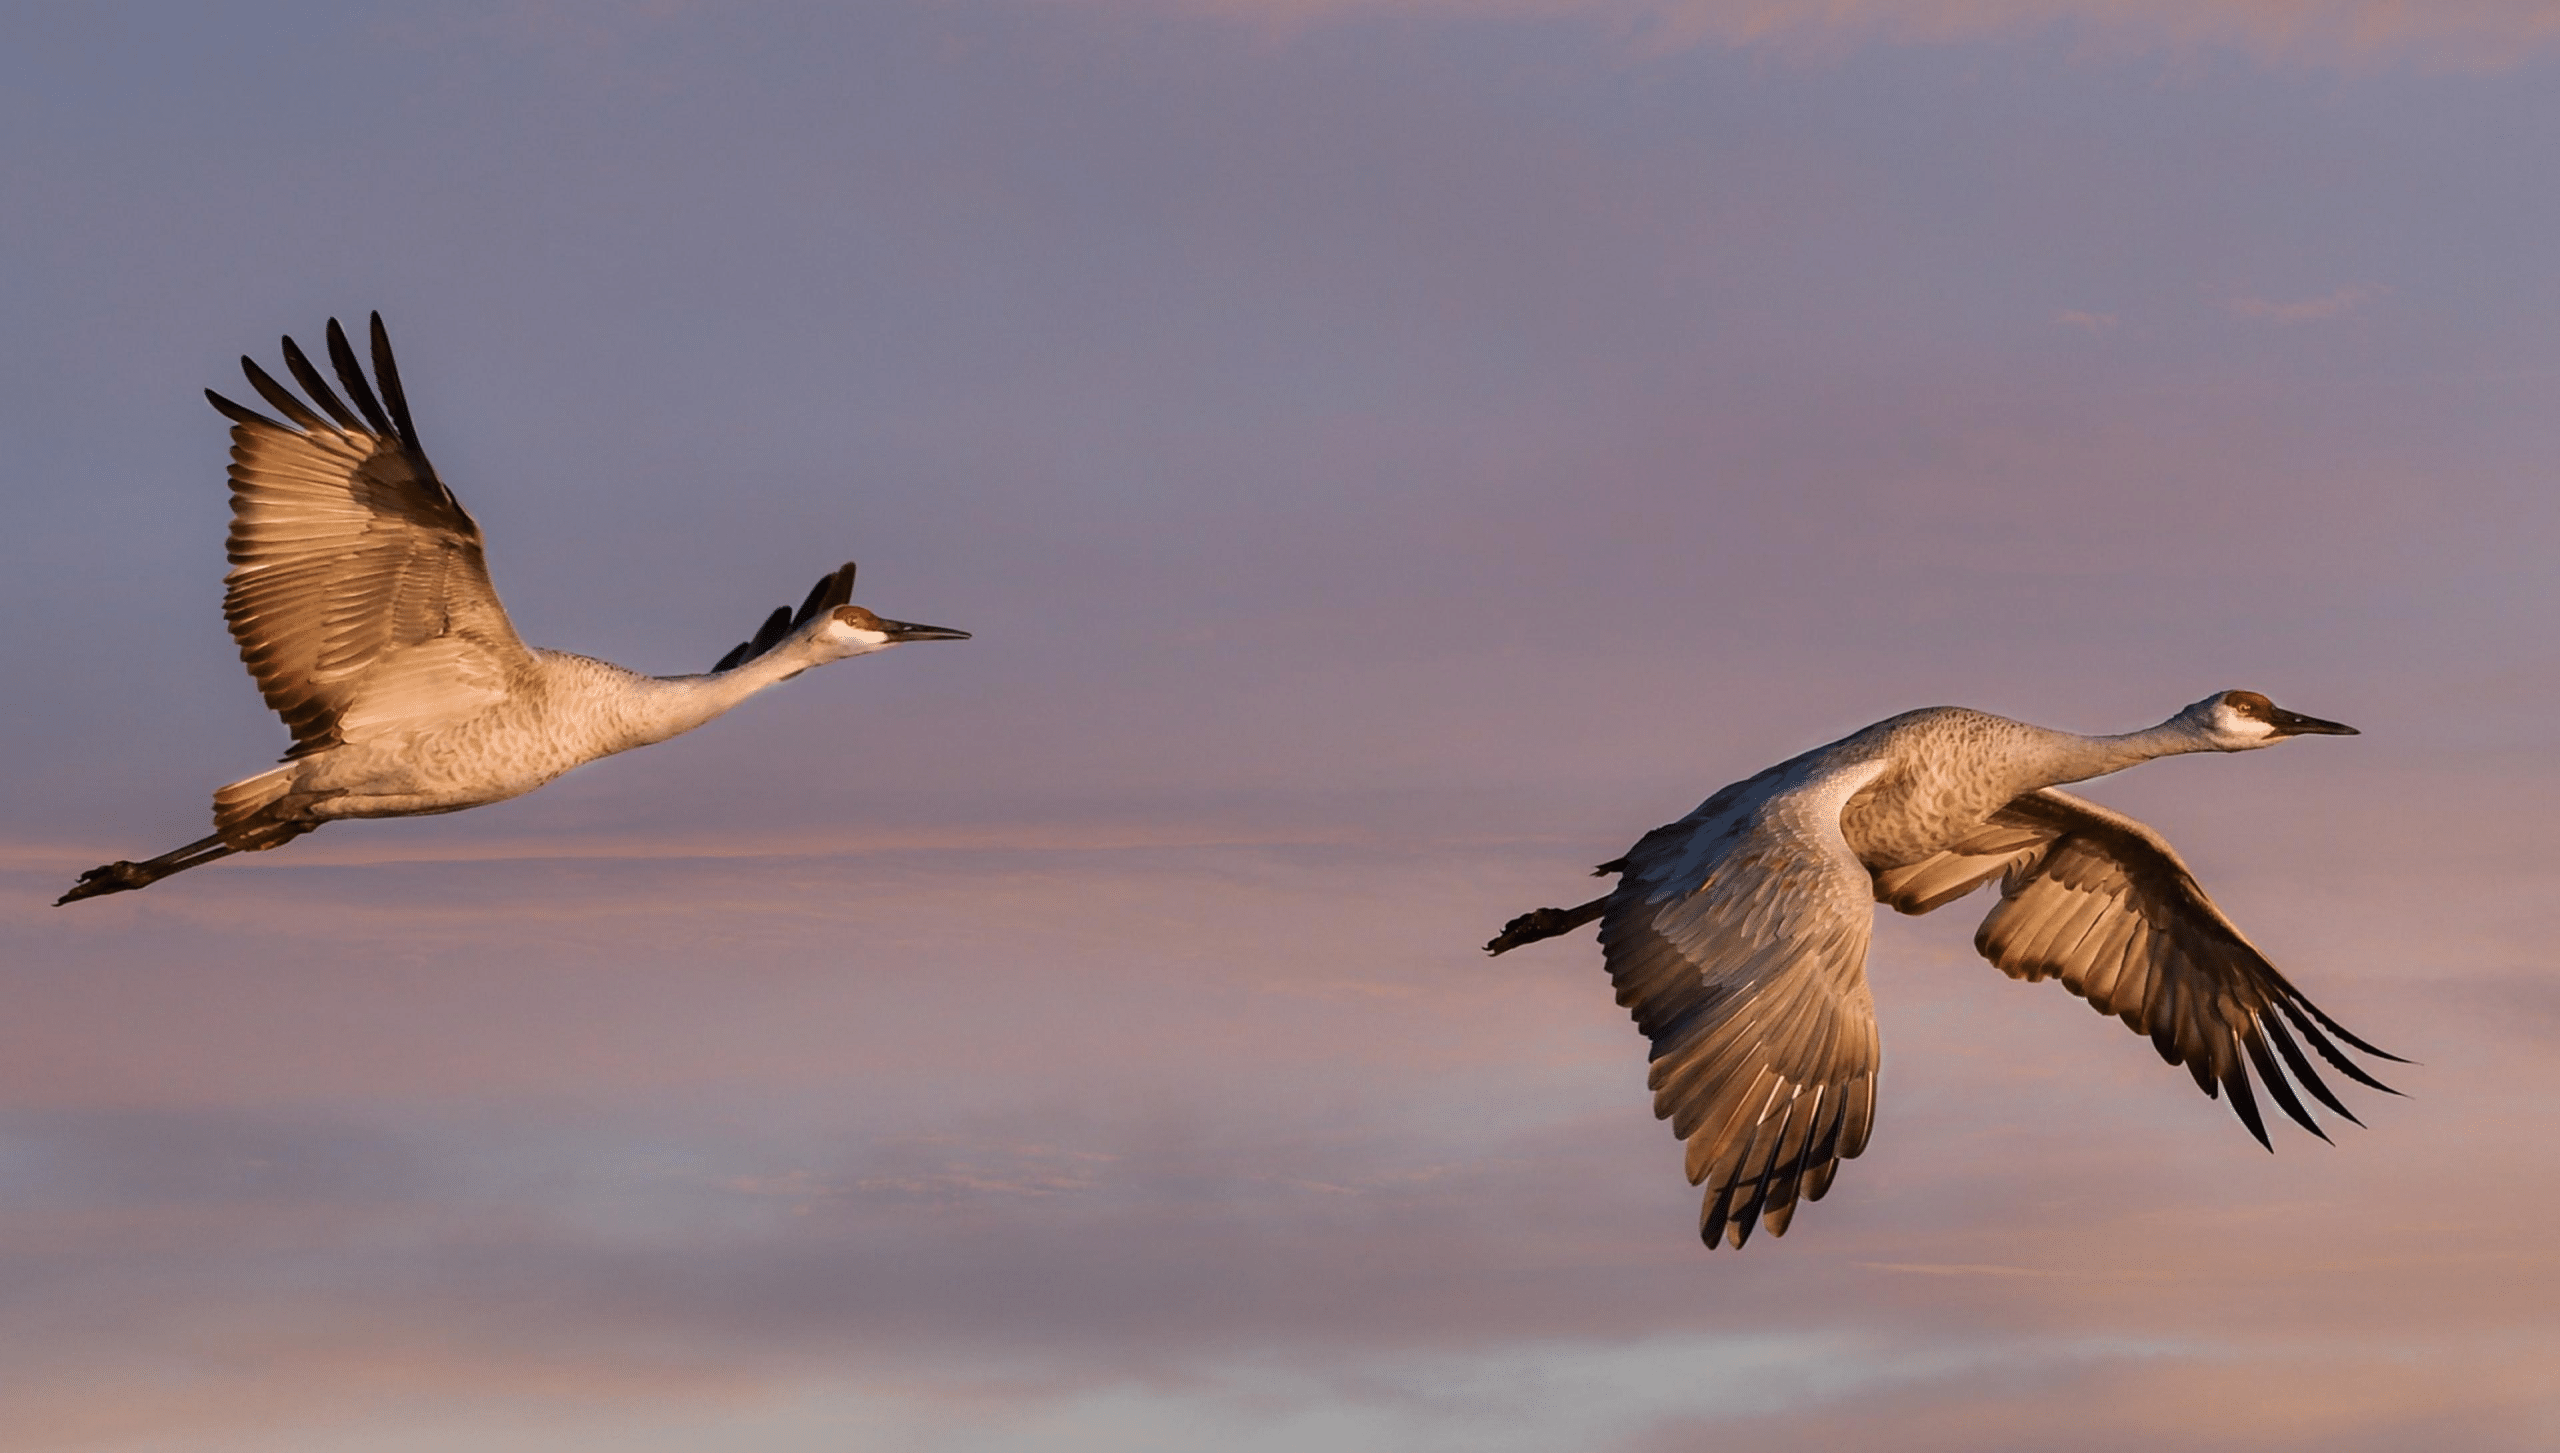
Have you ever dreamed of capturing the perfect shot of birds as they travel across the sky? Bird photography during migration is a unique chance to witness nature’s most stunning moments.
Imagine freezing the beauty of thousands of birds in motion, creating images that tell incredible stories. You’ll discover simple tips and tricks to make your photos stand out. Whether you’re a beginner or have some experience, you’ll learn how to use light, timing, and location to your advantage.
Get ready to transform your photography and see migration like never before!

Credit: www.chuckhaney.com
Planning Your Migration Shoot
Bird photography during migration is a great way to capture amazing moments. Planning your shoot helps you get the best photos.
Knowing the best times, places, and bird species will improve your chances of success.
Best Migration Seasons
Birds migrate mostly in spring and fall. These seasons have the highest bird activity.
Spring migration usually happens from March to May. Fall migration runs from August to November.
- Spring: Birds travel north to breed
- Fall: Birds move south to warmer areas
- Early mornings and late afternoons offer good light
Top Locations To Visit
Some places are better for bird migration photography. These spots attract many birds during migration.
- Coastal areas with wetlands and estuaries
- Large lakes and river valleys
- Mountain passes and ridges
- Bird sanctuaries and wildlife refuges
Check local parks and nature reserves in your region. They often have migration events.
Researching Bird Species
Knowing which birds migrate helps you plan where and when to shoot. Each species has its own timing.
Learn about the birds’ habits, appearance, and calls. This helps you spot them quickly.
- Find field guides or bird apps for your area
- Join birdwatching groups for tips
- Note the size, color, and flight patterns
- Understand feeding and resting spots
Gear Essentials
Bird photography during migration needs the right gear. Good equipment helps capture sharp photos of fast birds.
This guide covers important gear to bring. It focuses on cameras, lenses, and support tools.
Choosing The Right Camera
A camera with fast autofocus is best for bird photography. It helps keep birds in focus as they move.
Look for a camera with a high frame rate. This lets you take many photos quickly to catch the best moment.
- Use cameras with fast autofocus systems
- Choose models that shoot many frames per second
- Full-frame or APS-C sensors work well
- Good ISO performance helps in low light
Lenses For Bird Photography
Long lenses are essential for photographing birds from a distance. They let you get close shots without disturbing the birds.
Zoom lenses offer flexibility to adjust framing. Prime lenses often give sharper images but need more moving to compose shots.
- Use telephoto lenses of 300mm or longer
- Consider zoom lenses like 100-400mm for flexibility
- Prime lenses can provide sharper photos
- Look for lenses with fast autofocus motors
Tripods And Stabilizers
Tripods help keep your camera steady for clear shots. They reduce blur from hand shake, especially with long lenses.
Stabilizers like monopods add support and allow quick movement. Choose lightweight gear for easy carrying on long walks.
- Use sturdy tripods to hold heavy lenses
- Monopods help with faster tracking of birds
- Look for gear that is easy to carry outdoors
- Use tripod heads that allow smooth panning
Camera Settings For Action Shots
Bird photography during migration needs fast and precise camera settings. Birds move quickly, so use settings that capture sharp images.
Choosing the right settings helps freeze motion and keep your photos clear. Adjust your camera for fast action and changing light.
Optimal Shutter Speeds
Use fast shutter speeds to freeze flying birds and avoid blur. A speed of 1/1000 second or faster works well for most birds in flight.
For very fast birds, try 1/2000 second or higher. If lighting is low, increase ISO to keep shutter speed fast enough.
- Start at 1/1000 second for average bird speed
- Use 1/2000 second or faster for quick flyers
- Adjust ISO if shutter speed is too slow
Iso And Aperture Tips
Higher ISO lets you use faster shutter speeds in low light. Keep ISO as low as possible to reduce noise in photos.
Choose a wide aperture (small f-number) to let in more light. This also helps blur the background and highlight the bird.
- Set ISO between 400 and 1600 depending on light
- Use aperture f/4 to f/6.3 for sharp focus and background blur
- Raise ISO if light is too low for fast shutter speeds
Focus Modes For Moving Birds
Use continuous autofocus mode (AI Servo or AF-C) to track birds in flight. This mode keeps the bird in focus as it moves.
Select a focus area mode that covers a wide zone. This helps the camera find and follow the bird easily.
- Choose continuous autofocus (AF-C or AI Servo)
- Use dynamic or zone focus area for better tracking
- Keep shutter button half-pressed to maintain focus
Techniques For Capturing Birds In Flight
Bird photography during migration is exciting but can be tricky. Birds move fast and change direction often.
Using the right techniques helps you get sharp and clear photos of birds in flight.
Panning Methods
Panning means moving your camera to follow the bird’s flight. It keeps the bird sharp while blurring the background.
Start by tracking the bird smoothly and press the shutter while moving the camera. This shows motion and speed.
- Use a slower shutter speed, around 1/30 to 1/60 seconds
- Move the camera at the same speed as the bird
- Practice smooth and steady camera movement
Tracking Fast Movements
Birds migrate quickly, so tracking them is important. Use continuous autofocus to keep the bird in focus.
Set your camera to burst mode to take many shots fast. This raises your chance of catching good poses.
- Choose autofocus mode that follows moving subjects
- Hold the camera steady and follow the bird smoothly
- Use a fast shutter speed, 1/1000 seconds or faster
Timing The Perfect Shot
Timing is key to capturing a great bird photo. Watch the bird’s behavior to predict its moves.
Press the shutter just before the bird spreads its wings or changes direction for dynamic images.
- Observe the bird’s flight pattern carefully
- Anticipate moments like wing flaps or turns
- Use burst mode to increase shot chances
Using Light And Weather To Your Advantage
Bird photography during migration offers many chances for great photos. Light and weather play big roles in how your pictures look.
Understanding light and weather helps you take clear and beautiful bird photos. You can use these natural elements to improve your shots.
Golden Hour Benefits
The golden hour is just after sunrise or before sunset. The light is soft and warm at this time.
This light makes bird feathers glow and creates nice shadows. It also adds a warm color to your photos.
- Soft light reduces harsh shadows
- Warm colors enhance bird details
- Low sun angle adds depth and texture
- Backgrounds look more colorful and smooth
Handling Harsh Light
Midday sun can cause hard shadows and bright spots. This makes bird details harder to see.
You can find shade or use a diffuser to soften light. Shooting with the sun behind you also helps reduce glare.
- Look for shaded areas near trees or bushes
- Use a reflector or diffuser to soften light
- Shoot with the sun behind your back
- Adjust camera settings to avoid overexposure
Shooting In Different Weather
Weather changes can add mood and interest to your photos. Rain, fog, and clouds create unique effects.
Use weather to tell a story. Soft rain can make colors rich. Fog adds mystery. Clouds give even light.
- Rain: Use waterproof gear and capture water drops
- Fog: Focus on silhouettes and soft backgrounds
- Cloudy days: Take advantage of diffused light
- Wind: Capture birds in flight or moving feathers
Ethics And Safety In Bird Photography
Bird photography during migration is exciting and beautiful. It shows birds on their long journeys.
Photographers must respect birds and stay safe outside. Ethics guide how we interact with wildlife.
Respecting Wildlife
Always keep a safe distance from birds. Do not touch or chase them. Respect their space and natural behavior.
Use a zoom lens to capture images without getting too close. Avoid nesting areas and feeding spots.
- Keep distance to avoid stress
- Do not feed or bait birds
- Stay quiet and calm near birds
Minimizing Disturbance
Move slowly and avoid sudden actions that scare birds. Limit flash photography because it can frighten them.
Choose times when birds are less active. Avoid large groups that create noise and chaos.
- Walk quietly and slowly
- Turn off camera flash
- Visit alone or in small groups
- Stay on trails and avoid fragile areas
Staying Safe Outdoors
Wear weather-appropriate clothing. Bring water and snacks for long shoots. Know your location well.
Watch out for hazards like uneven ground and wildlife. Carry a first-aid kit and a phone for emergencies.
- Dress for weather and terrain
- Bring food and water
- Carry first-aid supplies
- Inform someone about your plans
- Stay aware of surroundings
Post-processing Tips
Post-processing helps improve bird photos taken during migration. It makes images clearer and more appealing. Editing can fix small issues and highlight the bird's beauty.
Use simple editing steps to make your photos stand out. Focus on details, colors, and composition to create strong images.
Enhancing Details
Sharpen the bird's feathers and eyes to bring out details. Use clarity or sharpening tools carefully to avoid noise. Enhancing details makes the bird look more alive.
Reduce background distractions by softening or blurring areas away from the bird. This keeps the focus on the subject.
Color Correction
Adjust colors to make the bird’s plumage look natural and vibrant. Fix white balance to remove unwanted color casts. This helps show the true colors of the bird.
Increase contrast slightly to add depth. Avoid over-saturating colors to keep the photo realistic.
- Correct white balance for accurate colors
- Enhance vibrancy without overdoing it
- Adjust contrast for better depth
Cropping For Impact
Crop photos to remove empty space and distractions. Focus on the bird’s position and direction. Use the rule of thirds to place the bird off-center for a natural look.
Cropping helps create a stronger composition. It draws attention to the bird and its movement during migration.

Credit: blog.henrys.com
Inspiring Migration Photography Ideas
Bird migration offers a great chance to capture amazing photos. Birds show unique behavior during this time. Photographers can find many creative ideas here.
These ideas help you tell stories and show the beauty of migration. Try different angles and moments for special shots.
Capturing Behavior And Interaction
Watch birds closely to see how they act during migration. Capture moments like feeding, flying, or resting. These show their survival skills.
Focus on interactions between birds too. Look for pairs flying together or groups gathering at stopover sites.
- Photograph birds feeding or sharing food
- Capture flight formations and patterns
- Show resting birds in natural settings
- Document birds communicating or caring for young
Storytelling Through Images
Use your photos to tell a story about migration. Show the journey birds take and the challenges they face. This makes your images more powerful.
Capture scenes that show changes in weather, landscapes, and bird emotions. These details add depth to your story.
- Start with birds preparing to migrate
- Show stopover sites with feeding birds
- Include images of birds flying in groups
- End with birds reaching their destination
Creative Composition
Try new ways to frame your photos. Use the environment to add interest and balance. This makes your pictures stand out.
Play with light, angles, and focus. Use close-ups or wide shots to show details or scenes.
- Use the rule of thirds to place birds off-center
- Capture reflections in water for extra effect
- Try silhouettes during sunrise or sunset
- Include plants or trees to add layers

Credit: www.onthewingphotography.com
Frequently Asked Questions
What Is The Best Time For Bird Photography?
The best time for bird photography during migration is early morning. Birds are most active at dawn, providing excellent lighting. This time offers a serene environment and vibrant colors. Early morning also reduces human disturbances, allowing photographers to capture more natural bird behaviors.
How Can I Locate Migratory Birds?
To locate migratory birds, research local migratory paths and hotspots. Use birdwatching apps and websites for real-time updates. Join local birdwatching groups for insights and tips. Observing water bodies, wetlands, and open fields often reveals diverse species.
What Camera Settings Work Best For Bird Photography?
For bird photography, use a fast shutter speed to capture movement. A high ISO setting is useful in low light. Adjust aperture for depth of field, ensuring sharp focus on birds. Continuous shooting mode helps capture action sequences effectively.
Why Is Migration Season Ideal For Bird Photography?
Migration season is ideal for bird photography due to the diversity of species. Birds display vibrant plumage and interesting behaviors. This season offers unique opportunities to capture rare and transient species. The influx of birds increases the chances of capturing dynamic and engaging photographs.
Conclusion
Capturing birds during migration offers a unique joy and challenge. Patience and timing matter most in this art. Watching birds fly by feels like a special gift. Each photo tells a story of nature’s journey. Keep your camera ready and eyes open.
Practice helps improve your shots every time. Enjoy the beauty and peace of bird migration. This experience connects you with nature’s rhythm and wonder.


