
Are you ready to capture stunning bird photos that stand out? Knowing the best bird photography settings can make all the difference between a blurry shot and a breathtaking image.
Whether you’re just starting out or looking to sharpen your skills, this guide will help you master the camera settings that bring your feathered friends to life. Keep reading, and you’ll discover easy tips to transform your bird photography and impress everyone with your shots.
Camera Modes For Bird Photography
Bird photography needs careful camera settings. Choosing the right mode helps capture clear and sharp images.
Each camera mode offers different control over light, focus, and motion. Learn which mode fits your shooting style.
Manual Mode Benefits
Manual mode lets you control all camera settings. You set shutter speed, aperture, and ISO yourself.
This mode is great for consistent results in changing light. You can adjust settings for sharp bird pictures.
- Full control over exposure
- Adjust settings for tricky light
- Ideal for experienced photographers
Using Aperture Priority
Aperture Priority mode lets you pick the aperture size. The camera sets shutter speed automatically.
This mode helps control depth of field. You can blur backgrounds and focus on the bird clearly.
- Easy to manage background blur
- Good for changing light conditions
- Keeps bird sharp and background soft
Shutter Priority For Motion
Shutter Priority lets you choose shutter speed. The camera sets aperture and ISO to match the light.
Fast shutter speed freezes bird movement. Slow shutter speed shows motion blur for creative shots.
- Freeze fast bird wings with high speed
- Use slower speed for motion effects
- Good for action and flight shots

Credit: digital-photography-school.com
Optimal Iso Settings
Choosing the right ISO is key for bird photography. It controls your camera's sensitivity to light.
Good ISO settings help keep your photos sharp and clear without too much noise.
Balancing Noise And Exposure
Higher ISO lets you shoot in darker places but adds more noise to images. Noise looks like grain or spots.
Lower ISO gives cleaner photos but needs more light. Find a balance based on your lighting and shutter speed.
- Use the lowest ISO possible for sharp images
- Increase ISO if shutter speed is too slow
- Accept some noise to keep birds sharp in low light
Iso In Different Lighting
Bright daylight lets you use low ISO like 100 or 200. This keeps noise very low.
In shade or cloudy weather, raise ISO to 400 or 800. This helps keep faster shutter speeds.
At dawn or dusk, use ISO 1600 or higher. This brightens images but adds noise.
| Lighting Condition | Recommended ISO |
|---|---|
| Bright Sunlight | 100-200 |
| Shade or Cloudy | 400-800 |
| Early Morning or Evening | 1600-3200 |
Auto Iso Tips
Auto ISO lets the camera pick ISO based on light. It helps keep exposure correct quickly.
Set a max ISO limit to avoid too much noise. This keeps photos cleaner.
- Use Auto ISO for fast-moving birds
- Set max ISO to 1600 or 3200 depending on your camera
- Check images often to adjust ISO limits
Aperture Choices
Aperture controls how much light enters the camera. It also changes the depth of field in photos.
Choosing the right aperture helps highlight birds and create beautiful images.
Depth Of Field Effects
A wide aperture (small f-number) makes the background blurry. This isolates the bird from the background.
A narrow aperture (large f-number) keeps more of the scene in focus. This shows the bird and its environment clearly.
- Wide aperture: f/2.8 to f/5.6 for soft backgrounds
- Narrow aperture: f/8 to f/11 for sharp details
Lens Selection Impact
Different lenses affect aperture and image quality. Telephoto lenses help fill the frame with the bird.
Fast lenses with wide apertures let in more light. This helps when shooting in low light or fast action.
- Telephoto lenses: 300mm or longer for close shots
- Fast lenses: f/2.8 or wider for better light capture
Background Blur Techniques
Background blur, or bokeh, makes the bird stand out. Using a wide aperture and longer lens helps create this effect.
Position the bird far from the background. This increases the blur and adds depth to the photo.
- Use wide apertures like f/2.8 to f/5.6
- Choose longer lenses to compress background
- Keep the bird away from busy backgrounds
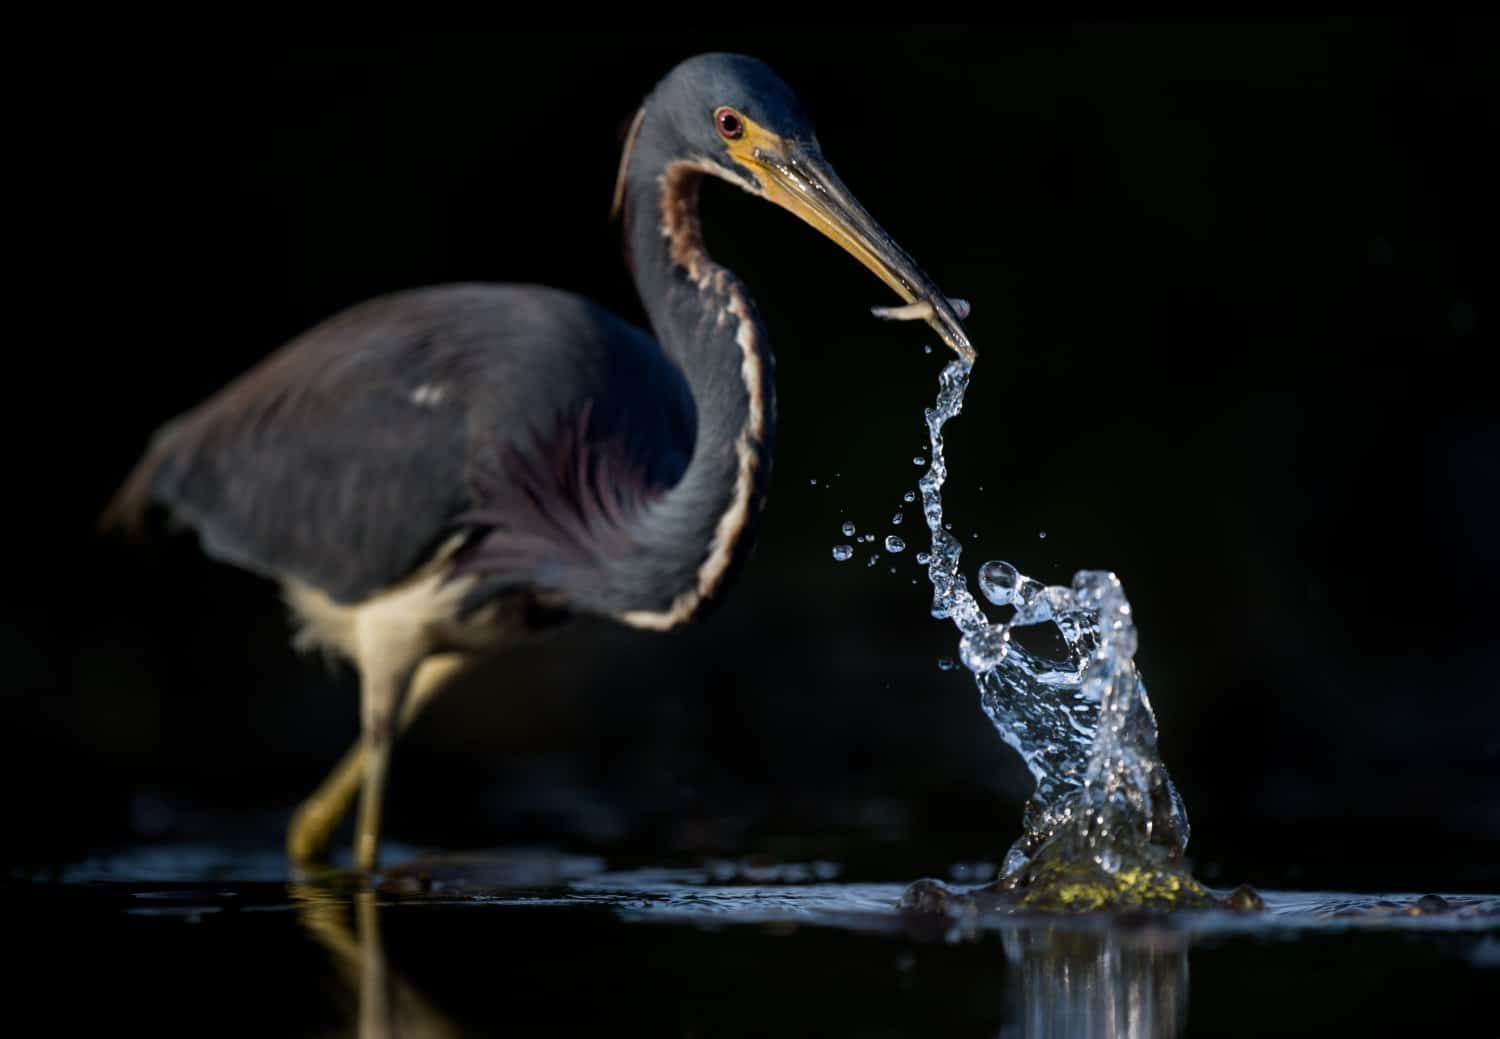
Shutter Speed Techniques
Shutter speed is key in bird photography. It controls how long your camera sensor is exposed to light.
Choosing the right shutter speed helps you capture clear and creative bird images.
Freezing Bird Movement
Fast shutter speeds stop the bird’s motion. This keeps the bird sharp in the photo.
Use shutter speeds of 1/1000 second or faster to freeze quick bird actions.
- Set shutter speed to 1/1000 or higher
- Use burst mode for multiple shots
- Increase ISO if light is low
Capturing Flight Blur
Slower shutter speeds create motion blur. This shows the bird’s wings moving.
Try shutter speeds between 1/30 and 1/125 second for smooth wing blur effects.
- Use a tripod to keep the camera steady
- Follow the bird with slow panning
- Adjust shutter speed to control blur amount
Adjusting For Light Conditions
Light affects the shutter speed you can use. Bright light allows faster speeds.
In low light, use a wider aperture or higher ISO to keep shutter speed fast enough.
| Light Condition | Recommended Shutter Speed | ISO Settings | Aperture |
|---|---|---|---|
| Bright daylight | 1/1000 to 1/2000 sec | 100-400 | f/5.6 to f/8 |
| Cloudy or shade | 1/500 to 1/1000 sec | 400-800 | f/4 to f/5.6 |
| Low light or dawn | 1/250 to 1/500 sec | 800-1600+ | f/2.8 to f/4 |
Focus Settings
Good focus settings help you take sharp bird photos. Birds can move fast and change direction often.
Choosing the right focus mode and points improves your chances of clear shots. Let’s explore key focus settings.
Single Vs Continuous Autofocus
Single autofocus locks focus on one spot. It works well for still birds or when you want to focus and recompose.
Continuous autofocus keeps adjusting focus as the bird moves. It is best for flying or active birds.
- Single autofocus: good for stationary birds
- Continuous autofocus: good for moving birds
- Use continuous mode to track flight or quick moves
Focus Points Selection
Focus points are small areas your camera uses to focus. You can select one or many points.
Choosing the right focus points helps keep the bird sharp. Use a single point for precise focus on eyes or head.
- Single focus point: precise focus on a small area
- Multiple focus points: cover more area for moving birds
- Center points are usually more sensitive and accurate
Tracking Moving Birds
Tracking helps the camera follow a bird as it moves. Use continuous autofocus with tracking enabled.
Set your camera to use many focus points or a tracking mode. This helps keep focus as the bird flies or hops.
- Use continuous autofocus (AF-C) for tracking
- Choose tracking focus mode if your camera has it
- Use multiple focus points to cover the bird’s movement path
- Practice panning smoothly with the bird
White Balance Tips
White balance helps keep your bird photos looking natural. It controls the colors in your pictures.
Setting white balance correctly makes birds' colors true to life. It also fixes color shifts from light sources.
Setting For Natural Colors
Choose the right white balance setting before you shoot. Use presets like Daylight or Cloudy for outdoor photos.
Auto white balance works but can change colors unexpectedly. Try manual settings for better control.
- Use Daylight for bright sun
- Cloudy adds warmth on overcast days
- Shade cools down colors in shadows
- Custom white balance matches exact light
Adjusting In Post-processing
Fix white balance after shooting with editing software. This helps correct small color errors.
Adjust the temperature slider to warm or cool the image. Use tint to fix green or magenta colors.
- Increase temperature to add warmth
- Lower temperature to cool colors
- Adjust tint to balance green or magenta
- Use eyedropper tool to pick neutral areas
Using Burst Mode
Burst mode helps capture many photos quickly. It is useful for bird photography.
This mode lets you take shots in fast sequence. You get more chances to catch the perfect moment.
Capturing Action Sequences
Burst mode records a series of images in a short time. It is great for fast bird movements.
You can capture flying birds or quick wing flaps with ease. It shows smooth motion in photos.
- Shoot in burst mode to track fast actions
- Use continuous autofocus for sharp images
- Hold the camera steady or use a tripod
- Choose a fast shutter speed to freeze motion
Selecting Best Frames
Burst mode produces many photos in one go. You need to pick the best shots later.
Look for sharp focus, good lighting, and great bird poses. Delete blurry or poor images.
- Check the bird’s eye for focus
- Choose frames with clear bird shapes
- Prefer images with good background
- Keep photos with interesting bird behavior

Credit: digital-photography-school.com
Lens Recommendations
Choosing the right lens is key for bird photography. The lens affects the details and clarity of your photos.
Good lenses help capture sharp images of birds from a distance. This guide covers lens types and features to consider.
Telephoto Lenses
Telephoto lenses have long focal lengths. They bring faraway birds closer without disturbing them.
These lenses often range from 300mm to 600mm or more. They help capture fine bird details like feathers and eyes.
- Ideal for photographing small or shy birds
- Allows shooting from a safe distance
- Provides tight framing of the subject
Prime Vs Zoom Lenses
Prime lenses have a fixed focal length. Zoom lenses cover a range of focal lengths.
Prime lenses usually offer sharper images and wider apertures. Zoom lenses give more framing flexibility.
- Prime lenses: sharper photos and better in low light
- Zoom lenses: easier to adjust composition quickly
- Prime lenses require moving your feet to reframe
- Zoom lenses are heavier but more versatile
Image Stabilization Benefits
Image stabilization helps reduce blur from camera shake. This is important with long lenses.
It allows slower shutter speeds while keeping images sharp. This helps in low light or when hand-holding the lens.
- Makes photos sharper without a tripod
- Useful for slow shutter speeds and long focal lengths
- Helps capture clear images of moving birds
Additional Camera Settings
Bird photography needs more than just good lenses and fast shutters. Extra camera settings help capture sharp and clear bird images. These settings adjust light and focus for better shots.
Adjusting the right camera settings improves photo quality. Below are key settings to consider for bird photography.
Exposure Compensation
Exposure compensation lets you make photos brighter or darker. Birds often appear against bright skies or dark backgrounds. Adjusting exposure helps keep details in the bird’s feathers.
Set exposure compensation to a positive value if the bird looks too dark. Use negative values if the bird looks too bright or washed out.
- +1 or +2 stops for dark birds against bright sky
- -1 or -2 stops for light birds in shaded areas
- Test small changes to avoid overexposed or underexposed photos
Metering Modes
Metering mode controls how the camera measures light. It decides which part of the scene to use for exposure settings. Choosing the right mode helps get correct brightness on the bird.
Spot metering is best for bird photography. It reads light from a small area, usually the bird itself. This avoids wrong exposure from bright or dark backgrounds.
- Spot Metering: Measures light on the bird only
- Center-Weighted: Focuses on center but includes surroundings
- Evaluative/Matrix: Measures whole scene, less accurate for birds
Using Tripods And Supports
Tripods and supports keep your camera steady. They reduce blur from hand movements. This is very helpful for long lenses and slow shutter speeds.
Use a tripod or monopod to hold your camera. A bean bag or camera strap can also help steady shots if you move a lot.
- Tripod: Best for stable, long sessions
- Monopod: Easier to move with while supporting weight
- Bean bag: Useful on uneven surfaces
- Camera strap: Helps stabilize when shooting handheld

Credit: www.teds.com.au
Frequently Asked Questions
What Camera Settings Work Best For Bird Photography?
Use a fast shutter speed (1/1000s or faster) to freeze motion. Set aperture around f/5. 6 for sharp subjects and blurred backgrounds. Use ISO 400-800 for balanced exposure. Shoot in continuous mode to capture action.
How Do I Focus Quickly On Birds In Flight?
Use continuous autofocus (AI Servo/AF-C) mode. Select a dynamic or zone focus area to track moving birds. Pre-focus on a spot where the bird will appear. This ensures sharp images of fast-moving subjects.
What Iso Is Ideal For Bird Photography?
ISO 400-800 works well in daylight to keep noise low. Increase ISO in low light to maintain fast shutter speeds. Modern cameras handle higher ISO well, but avoid going beyond ISO 3200 to reduce grain.
Should I Use Manual Or Auto Settings For Birds?
Auto settings help beginners capture quick shots easily. Manual mode offers full control over exposure for consistent results. Use aperture priority to control depth of field while letting the camera set shutter speed.
Conclusion
Capturing stunning bird photos requires the right camera settings. Adjust your shutter speed to freeze motion. A wide aperture helps blur the background, highlighting the bird. Adjust ISO for good light balance without noise. Use continuous focus for flying birds.
Practice makes perfect. Experiment with different settings. Each bird and situation is unique. Always be ready for unexpected moments. Patience and practice lead to amazing shots. Enjoy the process of learning and shooting. Happy birdwatching and photographing!


